| 일 | 월 | 화 | 수 | 목 | 금 | 토 |
|---|---|---|---|---|---|---|
| 1 | 2 | 3 | 4 | 5 | 6 | 7 |
| 8 | 9 | 10 | 11 | 12 | 13 | 14 |
| 15 | 16 | 17 | 18 | 19 | 20 | 21 |
| 22 | 23 | 24 | 25 | 26 | 27 | 28 |
- react-router
- sw expert academy
- react
- Get
- java
- json-server
- 이코테
- react-redux
- useDispatch
- Algorithm
- redux-saga
- C++
- 항해99
- 테코테코
- 매일메일
- 리액트
- 알고리즘
- redux-toolkit
- 코딩테스트합격자되기
- JavaScript
- createSlice
- axios
- 프로그래머스
- programmers
- 자바
- Python
- maeil-mail
- redux
- 항해플러스
- SW
- Today
- Total
Binary Journey
[React][CRUD] 리액트로 간단한 게시판 페이지 만들어보기 - 14. 댓글 달기(우선 댓글 저장부터), redux-toolkit, redux-saga, redux, reducer, useState, useDispatch, json-server, axios 본문
[React][CRUD] 리액트로 간단한 게시판 페이지 만들어보기 - 14. 댓글 달기(우선 댓글 저장부터), redux-toolkit, redux-saga, redux, reducer, useState, useDispatch, json-server, axios
binaryJournalist 2020. 11. 3. 17:25
목차 돌아가기: binaryjourney.tistory.com/pages/ReactCRUD-create-board-tutorial
[React][CRUD] create-board-tutorial
code: github.com/jwlee-lnd/react-create-board jwlee-lnd/react-create-board Description(korean) : https://binaryjourney.tistory.com/pages/ReactCRUD-create-board-tutorial - jwlee-lnd/react-create-boar..
binaryjourney.tistory.com
퇴근 전까지 진도 나갈 수 있을지는 모르겠으나 일단 도전해보겠다.
나는 화면부터 만들었다.
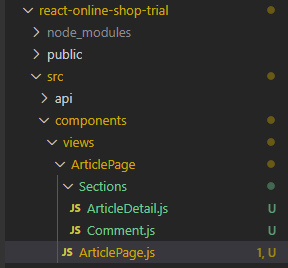
/src/components/views/ArticlePage/Sections 에 Comment.js 파일을 생성했다.

Comment 컴포넌트를 생성하는데 나름 스타일에도 힘줘봤다.
그닥 예쁘진 않다. 직접 보면 알 것이다.
// /src/components/views/ArticlePage/Sections/Comment.js

import React from "react";

function Comment() {
  return (
    <>
      <form>
        <div style={{ border: "1px solid black" }}>
          <textarea
            style={{
              borderStyle: "none none dashed none",
              borderColor: "black",
              width: "100%",
              display: "block",
              boxSizing: "border-box",
              borderWidth: "1px",
              marginBottom: "1px",
            }}
          />
          <div
            style={{
              width: "100%",
              boxSizing: "border-box",
              height: "35px",
              padding: "5px",
            }}
          >
            <button
              style={{
                border: "none",
                width: "100%",
                float: "right",
              }}
            >
              댓글 등록
            </button>
          </div>
        </div>
      </form>
    </>
  );
}

export default Comment;
댓글란은 게시글 화면에서 이 위치에 들어가게 할 거다

그러면 ArticlePage-ArticleDetail 둘 중 하나의 컴포넌트에 생성된 댓글이 달릴 것 같아서
Comment 컴포넌트를 ArtilcePage에서 작업하여 ArticleDetail 컴포넌트의 props로 보내주는 방법으로 했다.
// ArticlePage

import Comment from "./Sections/Comment";

return (
    <div style={{ width: "80%", margin: "3rem auto" }}>
      <div>
        <ArticleDetail
          id={id}
          title={title}
          content={content}
          views={views}
          date={date}
          handleDeleteClick={onDeleteClick}
          handleComment={
            <Comment />
          }
        />
      </div>
    </div>
  );
// ArticleDetail

<div style={{ margin: "2rem auto" }}>{props.handleComment}</div>
ArticlePage가 Comment의 컨테이너 컴포넌트 역할을 대신하기 때문에
textArea 입력에 필요한 useState와 onChange 이벤트 함수를 만들어서 Comment의 props로 넣어줬다.
// ArticlePage


  const [CommentValue, setCommentValue] = useState("");

  const onCommentChange = (e) => {
    setCommentValue(e.currentTarget.value);
  };

  const onCommentSubmit = () => {}; // reducer 만들고 추가 예정

  return (
    <div style={{ width: "80%", margin: "3rem auto" }}>
      <div>
        <ArticleDetail
          id={id}
          title={title}
          content={content}
          views={views}
          date={date}
          handleDeleteClick={onDeleteClick}
          handleComment={
            <Comment
              comment={CommentValue}
              handleCommentChange={onCommentChange}
              handleCommentSubmit={onCommentSubmit}
            />
          }
        />
      </div>
    </div>
  );
}
// Comment

import React from "react";

function Comment(props) {
  console.log(props.comment);
  return (

...
            value={props.comment}
            onChange={props.handleCommentChange}

...
  );
}

export default Comment;
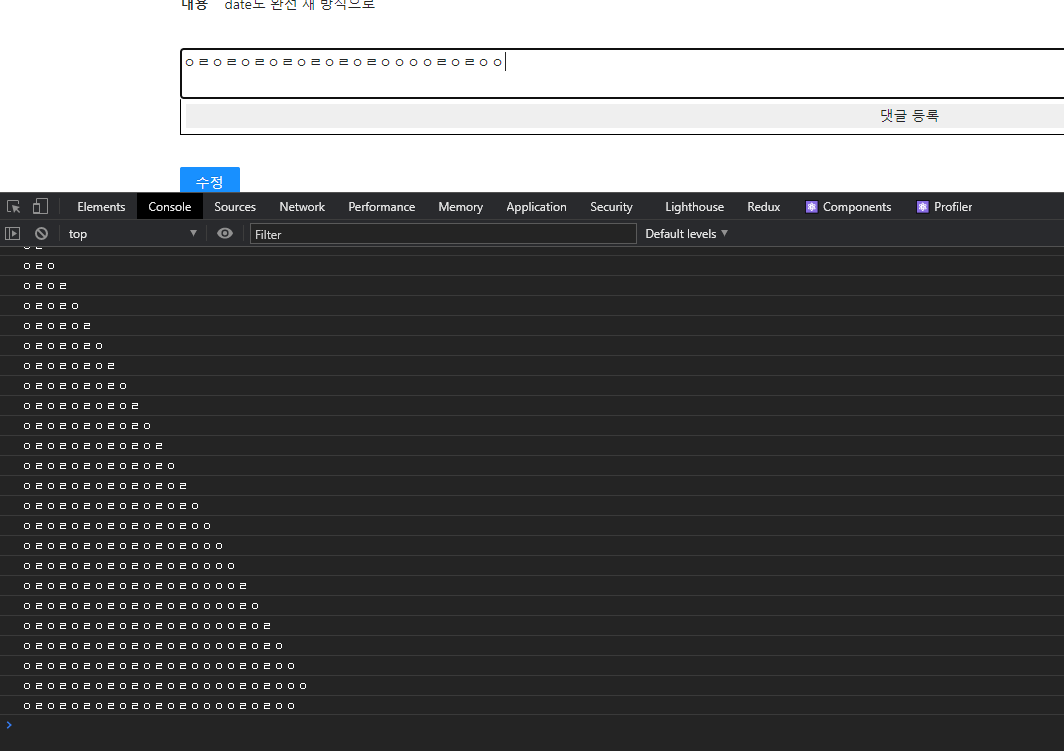
개발자 창을 열어 값이 잘 들어가는지 확인해보자

잘 들어간다.
보면 댓글이 치는 순간마다 렌더가 되기 때문에 최적화를 위해 ArticlePage의 useSelector 로 id, title, content를 만들어주는 부분에 shallowEqual을 달아주자.
// ArticlePage

import { shallowEqual, useDispatch, useSelector } from "react-redux";

  const { id, title, content, date } = useSelector(
    (state) => ({
      id: state.articleReducers.id,
      title: state.articleReducers.title,
      content: state.articleReducers.content,
      date: state.articleReducers.date // date도 합쳐버리기!
    }),
    shallowEqual
  );
  const views = useSelector((state) => state.articleReducers.views);
댓글 저장을 구현하려면 잠시 json-server 를 꺼야 한다.
board.json 구조를 수정해야 하기 때문이다.
{
  "board": [

  ],
  "comment": [

  ]
}
이렇게 바꿔주고 서버를 다시 킨다.
npx json-server ./board.json --port 4000
json server terminal을 보면 Resources 부분에 /comment가 새로 생긴 것을 알 수 있다.

http://localhost:4000/comment
로 들어가보면 이렇게 떠 있다

이제 commentSlice를 만들어준다.
// commentSlice

import { createSlice } from "@reduxjs/toolkit";

export const commentSlice = createSlice({
  name: "comment",
  initialState: {
    id: 0,
    content: "",
    date: Date.now(),
    articleId: 0,
    comments: [],
  },
  reducers: {
    registerComment: (state, { payload: comment }) => {
      console.log("댓글 등록 액션 호출 -- registerComment"); // saga 애서 감시용
    },
    getCommentsAsync: (state, { payload: list }) => {
      return {
        ...state,
        comments: list,
      };
    },
  },
});

export const commentReducers = commentSlice.reducer;
export const commentActions = commentSlice.actions;
그리고 commentSaga를 만들어 액션함수를 import 하여 함수를 만들어준다.
// commentSaga

import Axios from "axios";
import history from "../utils/history";

export function* registerCommentAsync(action) {
  const data = action.payload;

  yield Axios.post(`http://localhost:4000/comment/`, data);

  history.go(0); // refresh
}
rootSlice에서 만들어진 commentReducer 를 묶고
// rootSlice

import { combineReducers } from "redux";
import { articleReducers } from "./articleSlice";
import { boardReducers } from "./boardSlice";
import { commentReducers } from "./commentSlice"; // 추가

const rootReducer = combineReducers({
  articleReducers,
  boardReducers,
  commentReducers, // 추가
});

export default rootReducer;
rootSaga 에서는 감시할 액션과 함께 호출할 saga 함수를 적고
// rootSaga

import { take, takeEvery, takeLatest } from "redux-saga/effects";
...
import { commentActions } from "../slice/commentSlice"; // 추가
...
import { registerCommentAsync } from "./commentSaga"; //추가

...
const { registerComment } = commentActions; // 추가

export default function* rootWatcher() {
  ...
  yield takeLatest(registerComment.type, registerCommentAsync); // 추가
}
마지막으로 ArticlePage 컴포넌트에서 onCommentSubmit 이벤트 함수를 마무리지어주면 된다.
나는 validation 체크도 넣어줬다.
// ArticlePage

import { commentActions } from "../../../slice/commentSlice";

  const onCommentSubmit = () => {
    if (
      CommentValue === "" ||
      CommentValue === null ||
      CommentValue === undefined
    ) {
      alert("댓글을 입력하십시오.");
      return false;
    }
    const comment = {
      id: 0,
      content: CommentValue,
      date: Date.now(),
      articleId: id,
    };

    dispatch(commentActions.registerComment(comment));
  };
full code는 이렇다.
// ArticlePage

import React, { useEffect, useState } from "react";
import { useDispatch, useSelector } from "react-redux";
import { articleActions } from "../../../slice/articleSlice";
import { commentActions } from "../../../slice/commentSlice"; // 추가
import ArticleDetail from "./Sections/ArticleDetail";
import Comment from "./Sections/Comment";

function ArticlePage({ match, location }) {
  // console.log(match.params.articleId);

  const dispatch = useDispatch();

  useEffect(() => {
    dispatch(articleActions.getArticle(match.params.articleId));
  }, [match.params.articleId]);

  const { id, title, content, date } = useSelector(
    (state) => ({
      id: state.articleReducers.id,
      title: state.articleReducers.title,
      content: state.articleReducers.content,
      date: state.articleReducers.date
    }),
    shallowEqual
  );
  const views = useSelector((state) => state.articleReducers.views);

  const onDeleteClick = () => {
    if (!window.confirm("삭제하시겠습니까?")) return false;
    dispatch(articleActions.deleteArticle(id));
  };

  const [CommentValue, setCommentValue] = useState("");

  const onCommentChange = (e) => {
    setCommentValue(e.currentTarget.value);
  };

  const onCommentSubmit = () => {
    if (
      CommentValue === "" ||
      CommentValue === null ||
      CommentValue === undefined
    ) {
      alert("댓글을 입력하십시오.");
      return false;
    }
    const comment = {
      id: 0,
      content: CommentValue,
      date: Date.now(),
      articleId: id,
    };

    dispatch(commentActions.registerComment(comment));
  };

  return (
    <div style={{ width: "80%", margin: "3rem auto" }}>
      <div>
        <ArticleDetail
          id={id}
          title={title}
          content={content}
          views={views}
          date={date}
          handleDeleteClick={onDeleteClick}
          handleComment={
            <Comment
              comment={CommentValue}
              handleCommentChange={onCommentChange}
              handleCommentSubmit={onCommentSubmit}
            />
          }
        />
      </div>
    </div>
  );
}

export default ArticlePage;
Comment.js ------------------------ 2021-04-08 댓글 등록 부분 코드가 블로그에 없다 하여 수정합니다.
// Comment.js

import React from "react";

function Comment(props) {
  return (
    <>
      <form>
        <div style={{ border: "1px solid black" }}>
          <textarea
            style={{
              borderStyle: "none none dashed none",
              borderColor: "black",
              width: "100%",
              display: "block",
              boxSizing: "border-box",
              borderWidth: "1px",
              marginBottom: "1px",
            }}
            value={props.comment}
            onChange={props.handleCommentChange}
          />
          <div
            style={{
              width: "100%",
              boxSizing: "border-box",
              height: "35px",
              padding: "5px",
            }}
          >
            <button
              style={{
                border: "none",
                width: "100%",
                float: "right",
              }}
              onClick={props.handleCommentSubmit} {/* 추가됨 */}
            >
              댓글 등록
            </button>
          </div>
        </div>
      </form>
    </>
  );
}

export default Comment;
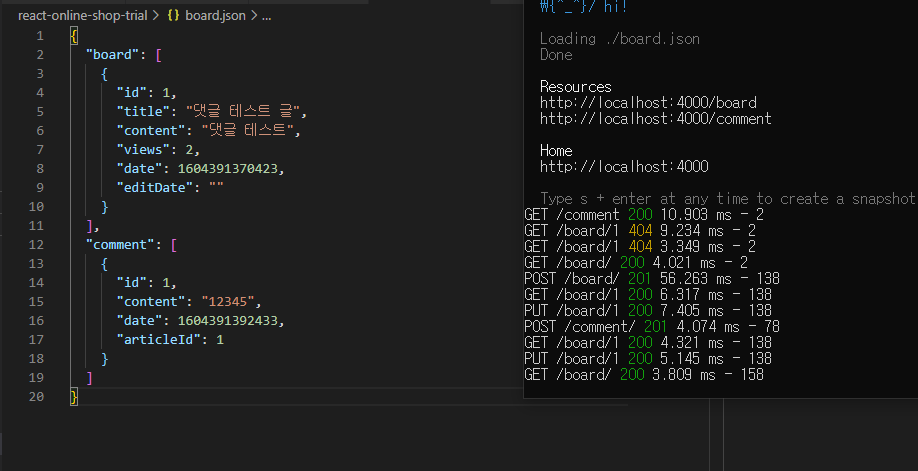
저장해보면!

comment 에 데이터가 잘 들어간 것이 보인다!
(json-server의 put은 조회수 반영때문에 일어난 것이다.)
다음편에서는 게시글 화면에 댓글 목록을 가져오는 것을 다루겠다!
목차 돌아가기: binaryjourney.tistory.com/pages/ReactCRUD-create-board-tutorial
[React][CRUD] create-board-tutorial
code: github.com/jwlee-lnd/react-create-board jwlee-lnd/react-create-board Description(korean) : https://binaryjourney.tistory.com/pages/ReactCRUD-create-board-tutorial - jwlee-lnd/react-create-boar..
binaryjourney.tistory.com


