| 일 | 월 | 화 | 수 | 목 | 금 | 토 |
|---|---|---|---|---|---|---|
| 1 | 2 | 3 | 4 | 5 | 6 | 7 |
| 8 | 9 | 10 | 11 | 12 | 13 | 14 |
| 15 | 16 | 17 | 18 | 19 | 20 | 21 |
| 22 | 23 | 24 | 25 | 26 | 27 | 28 |
- axios
- createSlice
- JavaScript
- java
- 프로그래머스
- react
- Get
- 매일메일
- react-redux
- 이코테
- 리액트
- 자바
- Python
- json-server
- sw expert academy
- 항해99
- useDispatch
- SW
- programmers
- 알고리즘
- 코딩테스트합격자되기
- react-router
- 테코테코
- C++
- redux-toolkit
- redux-saga
- Algorithm
- 항해플러스
- redux
- maeil-mail
- Today
- Total
Binary Journey
[React][CRUD] 리액트로 간단한 게시판 페이지 만들어보기 - 13. 게시글 삭제하기, redux-toolkit , redux-saga, useDispatch, react router history, axios delete 본문
[React][CRUD] 리액트로 간단한 게시판 페이지 만들어보기 - 13. 게시글 삭제하기, redux-toolkit , redux-saga, useDispatch, react router history, axios delete
binaryJournalist 2020. 11. 3. 12:36
목차 돌아가기: binaryjourney.tistory.com/pages/ReactCRUD-create-board-tutorial
[React][CRUD] create-board-tutorial
code: github.com/jwlee-lnd/react-create-board jwlee-lnd/react-create-board Description(korean) : https://binaryjourney.tistory.com/pages/ReactCRUD-create-board-tutorial - jwlee-lnd/react-create-boar..
binaryjourney.tistory.com
이제 board.json을 비우는 등의 서버를 직접 건드리는 일은 더 이상 발생하지 않도록 게시글 삭제 기능을 만들겠다.
시작하기 전에 양해를 구할 것은
ArticleDetail과 ArticlePage를 약간 수정했다.
컨테이너 컴포넌트와 프레젠테이셔널 컴포넌트에 맞게 버튼 자리를 바꿨을 뿐이고 오늘 만들 삭제버튼도 추가되었다.
코드를 통째로 보여주면
// ArticleDetail

import React from "react";
import { Button, Typography } from "antd";
import { Link } from "react-router-dom";

const { Title } = Typography;

function ArticleDetail(props) {
  return (
    <div>
      <div style={{ margin: "2rem auto" }}>
        <a href="/">
          <Button type="primary">목록으로 가기</Button>
        </a>
      </div>
      <div style={{ textAlign: "center" }}>
        <Title>게시글</Title>
      </div>
      <div>
        <table>
          <colgroup>
            <col width="10%" />
            <col width="40%" />
            <col width="10%" />
            <col width="40%" />
          </colgroup>
          <tr>
            <th>번호</th>
            <td>{props.id}</td>
            <th>조회수</th>
            <td>{props.views}</td>
          </tr>
          <tr>
            <th>제목</th>
            <td colspan="3">{props.title}</td>
          </tr>
          <tr>
            <th>내용</th>
            <td colspan="3">{props.content}</td>
          </tr>
        </table>
      </div>
      <div style={{ margin: "2rem auto" }}>
        <Link to={`/edit/${props.id}?isForEdit=true`}>
          <Button type="primary">수정</Button>
        </Link>
      </div>
      <div style={{ margin: "auto" }}>
        <Button type="danger">삭제</Button> {/* 오늘 할 부분 */}
      </div>
    </div>
  );
}

export default ArticleDetail;
// ArticlePage


import React, { useEffect } from "react";
import { useDispatch, useSelector } from "react-redux";
import { articleActions } from "../../../slice/articleSlice";
import ArticleDetail from "./Sections/ArticleDetail";

function ArticlePage({ match, location }) {
  // console.log(match.params.articleId);

  const dispatch = useDispatch();

  useEffect(() => {
    dispatch(articleActions.getArticle(match.params.articleId));
  }, [match.params.articleId]);

  const { id, title, content } = useSelector((state) => ({
    id: state.articleReducers.id,
    title: state.articleReducers.title,
    content: state.articleReducers.content,
  }));
  const date = useSelector((state) => state.articleReducers.date);
  const views = useSelector((state) => state.articleReducers.views);

  return (
    <div style={{ width: "80%", margin: "3rem auto" }}>
      <div>
        <ArticleDetail
          id={id}
          title={title}
          content={content}
          views={views}
          date={date}
        />
      </div>
    </div>
  );
}

export default ArticlePage;
실무에서 삭제 기능은 서버에서 데이터를 영구삭제하는 것보다는 사용 여부 항목을 N 으로 update 한다.
하지만 json-server를 이용한 간단한 페이지를 만드는 과정이므로 나는 delete 를 쓰겠다 ^_________________^
update 방식으로 가도 괜찮다. 하지만 지금으로썬 필드도 새로 만들어야 하고,,,고칠 게 많을 것이다.
이번 편은 게시글 화면에 들어가서 삭제버튼 눌러 삭제 처리하는 것까지 목표로 하였고 목록에서 직접 삭제 구현은 사실 계획에 없었다.
articleReducer에서 삭제 후 boardReducer로 조회하면 될 것 같긴 한데
어차피 게시글 화면에서 삭제해도 목록으로 돌아가니까
일단 만들고 동일 로직으로 목록에 버튼만 추가해서 그게 가능한지까지 알아보겠다.
게시글 수정과 방식이 너무 비슷하여 이젠 다들 익숙하지 않을까 싶다.
우선 articleSlice에 삭제 액션을 만든다.
// articleSlice


    deleteArticle: (state, { payload: id }) => {
      console.log("게시글 삭제 액션 호출 -- deleteArticle"); // saga 에서 감시용
    },
그리고 articleSaga에서 deleteArticle 이 dispatch 됐을 때 서버와 연결할 함수를 만든다.
// articleSaga


export function* deleteArticleAsync(action) {
  const id = action.payload;

  yield Axios.delete(`http://localhost:4000/board/${id}`);

  alert("삭제되었습니다.");

  history.push(`/`);
}
첫화면으로 돌아가면 자동으로 목록이 조회되므로 추가 액션은 넣지 않았다.
rootSaga에서 감시할 액션 타입과 saga 함수를 연결해준다.
// rootSaga

import { take, takeEvery, takeLatest } from "redux-saga/effects";
import { articleActions } from "../slice/articleSlice";
import { boardActions } from "../slice/boardSlice";
import {
  registerArticleAsync,
  getArticleAsync,
  fetchArticleAsync,
  updateArticleAsync,
  deleteArticleAsync,
} from "./articleSaga";
import { getBoardAsync } from "./boardSaga";

const {
  registerArticle,
  getArticle,
  fetchArticle,
  updateArticle,
  deleteArticle,
} = articleActions;
const { getBoard } = boardActions;

export default function* rootWatcher() {
  yield takeLatest(registerArticle.type, registerArticleAsync);
  yield takeEvery(getArticle.type, getArticleAsync);
  yield takeEvery(getBoard.type, getBoardAsync);
  yield takeEvery(fetchArticle.type, fetchArticleAsync);
  yield takeLatest(updateArticle.type, updateArticleAsync);
  yield takeLatest(deleteArticle.type, deleteArticleAsync);
}
그리고 ArticlePage 컴포넌트로 돌아와서
button onClick 값으로 들어갈 함수를 만들어주고 ArticleDetail의 프로퍼티로 보낸다.
삭제하기 전에 삭제 동의를 묻는 것도 필요할 것 같아 만들어주었다.
// ArticlePage


  const onDeleteClick = () => {
    if (!window.confirm("삭제하시겠습니까?")) return false;
    dispatch(articleActions.deleteArticle(id));
  };

  return (
    <div style={{ width: "80%", margin: "3rem auto" }}>
      <div>
        <ArticleDetail
          id={id}
          title={title}
          content={content}
          views={views}
          date={date}
          handleDeleteClick={onDeleteClick}
        />
      </div>
    </div>
  );
ArticleDetail 컴포넌트에서는 props.handleDeleteClick로 onDeleteClick 이벤트 함수를 받아 button onClick에 넣는다.
// ArticleDetail


        <Button onClick={props.handleDeleteClick} type="danger">
          삭제
        </Button>
편집한 파일들을 저장하고 화면에서 삭제버튼을 눌러보자.
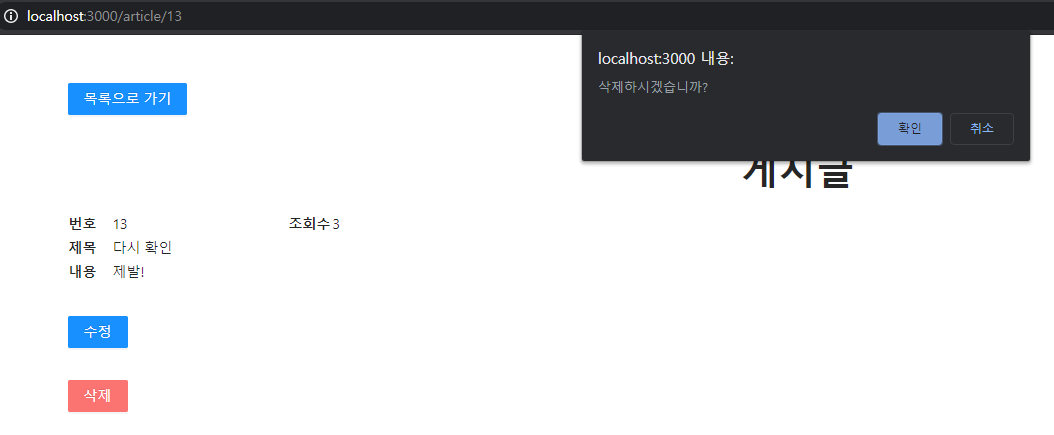
번호가 13번인 글에서 삭제를 시도한다


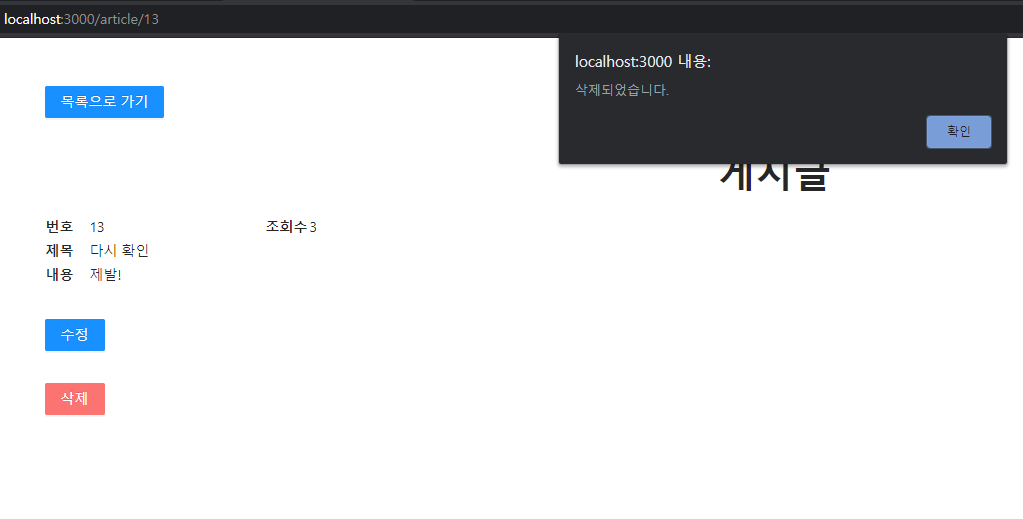
saga에서 쓴 알림 과정을 지나면..........!
첫 화면으로 가면서 목록을 불러오는데 12번까지 밖에 없다!

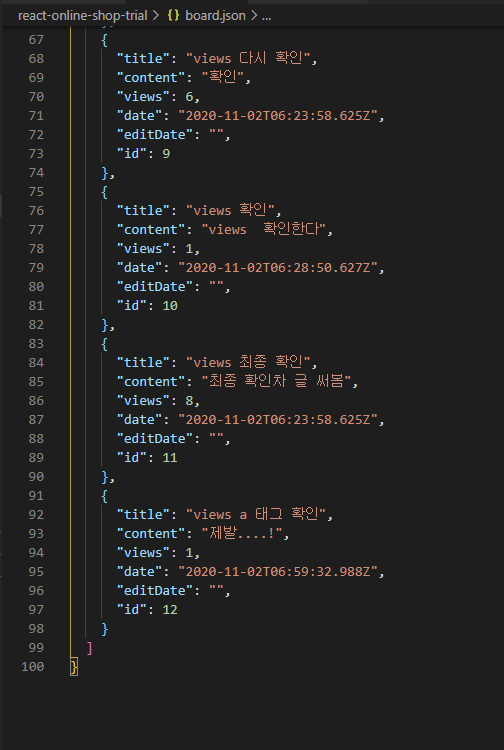
화면 뿐만 아니라 서버에도 잘 들어갔는지 알아보고 싶다면


board.json을 확인해보면 된다.
처음부터 새로 시작하는 마음으로 나는 board.json 에 있는 데이터를 모두 지울 것이다.
게시글 클릭해서 지우기 너무 귀찮지 않은가? 같은 기능을 BoardPage에 놨을 때 어떻게 되는지 알아보자.
(근데 사실 이게 맞는지 잘 모르겠다. history 잘 아시는 분 있으면 꼭 댓글을 남겨주세요....)
BoardPage 컴포넌트에 onDeleClick 이벤트 함수를 붙여넣는다.
여기는 id를 갖고 오는 곳이 없으니 인자값으로 id를 넣어놔야 한다.
// BoardPage

  const onDeleteClick = (id) => {
    if (!window.confirm("삭제하시겠습니까?")) return false;
    dispatch(articleActions.deleteArticle(id));
  };
그리고 BoardList 컴포넌트의 프로퍼티로 넘겨준다.
// BoardPage


  return (
    <div style={{ maxWidth: "700px", margin: "2rem auto" }}>
      <div>
        <Link to="/register?isForEdit=false">
          <Button type="primary">New Post</Button>
        </Link>
      </div>
      <div style={{ textAlign: "center", marginBottom: "2rem" }}>
        <Title>Board Title</Title>
      </div>
      <div>
        {error ? (
          <h2>에러 발생: {error}</h2>
        ) : isSuccess && board.length > 0 ? (
          <BoardList board={board} handleDeleteClick={onDeleteClick} />
        ) : isSuccess && board.length <= 0 ? (
          <p> 조회할 내용이 없습니다. </p>
        ) : (
          <p> 목록을 불러오는 중입니다. </p>
        )}
      </div>
    </div>
  );
BoardList 에서는 버튼 onClick 부분에 props 로 받아주면 된다
// BoardList

  return (
    <div>
      <table>
        <colgroup>
          <col width="10%" />
          <col width="70%" />
          <col width="10%" />
          <col width="10%" />
        </colgroup>
        <tbody>
          <tr>
            <th>번호</th>
            <th>제목</th>
            <th>조회수</th>
            <th></th>
          </tr>
        </tbody>
        <tbody>
          {props.board.map((article) => (
            <tr key={article.id}>
              <td>{article.id}</td>
              <Link to={`/article/${article.id}`}>
                <td>{article.title}</td>
              </Link>
              <td>{article.views}</td>
              <td>
                <Button onClick={() => props.handleDeleteClick(article.id)}>
                  X
                </Button>
              </td>
            </tr>
          ))}
        </tbody>
      </table>
    </div>
  );
boardpage에서는 새로고침하지 않는 이상 목록 조회가 안 되기 때문에
임시방책으로 saga에서 새로고침을 해주자 (BoardPage onDeleteClick 내에서 새로고침을 할 경우 서버에 반영되기 전에 새로고침 해버림)
// articleSaga

export function* deleteArticleAsync(action) {
  const id = action.payload;

  yield Axios.delete(`http://localhost:4000/board/${id}`);

  alert("삭제되었습니다.");

  history.push(`/`);

  history.go(0); // 추가부분, 새로고침
}
logger에도 getBoard 액션이 여러 개 찍히지 않는 걸 보니 괜찮은 것 같다.
여러 개를 삭제하고 난 후 모습이다.

다음 편에는 지난번에 해결하지 못한 date를 해결해보고(성공 가능성 불확실) date 해결 여부 상관없이 댓글 기능도 가능하면 구현해보겠다.
목차 돌아가기: binaryjourney.tistory.com/pages/ReactCRUD-create-board-tutorial
[React][CRUD] create-board-tutorial
code: github.com/jwlee-lnd/react-create-board jwlee-lnd/react-create-board Description(korean) : https://binaryjourney.tistory.com/pages/ReactCRUD-create-board-tutorial - jwlee-lnd/react-create-boar..
binaryjourney.tistory.com


