| 일 | 월 | 화 | 수 | 목 | 금 | 토 |
|---|---|---|---|---|---|---|
| 1 | 2 | 3 | 4 | 5 | 6 | 7 |
| 8 | 9 | 10 | 11 | 12 | 13 | 14 |
| 15 | 16 | 17 | 18 | 19 | 20 | 21 |
| 22 | 23 | 24 | 25 | 26 | 27 | 28 |
- redux-saga
- maeil-mail
- redux-toolkit
- redux
- 자바
- Get
- java
- Python
- C++
- react-redux
- 알고리즘
- 항해99
- axios
- json-server
- react
- SW
- createSlice
- 리액트
- 매일메일
- 코딩테스트합격자되기
- Algorithm
- react-router
- JavaScript
- useDispatch
- sw expert academy
- 프로그래머스
- 항해플러스
- 이코테
- 테코테코
- programmers
- Today
- Total
Binary Journey
[React][CRUD] 게시판 만들기 All in One (6). 댓글 리스트 조회, 댓글 달기, 댓글 삭제, axios, redux-saga, redux-toolkit, axios, get, post, delete 본문
[React][CRUD] 게시판 만들기 All in One (6). 댓글 리스트 조회, 댓글 달기, 댓글 삭제, axios, redux-saga, redux-toolkit, axios, get, post, delete
binaryJournalist 2021. 4. 14. 16:31
목차돌아가기:
binaryjourney.tistory.com/pages/ReactCRUD-create-board-tutorial-v2
[React][CRUD] create-board-tutorial-v2
* 인용시 출처 부탁드립니다. 완성 소스 code: github.com/cruellaDev/react-create-board-v2 cruellaDev/react-create-board-v2 updated version of react-create-board. Contribute to cruellaDev/react-create-..
binaryjourney.tistory.com
이번엔 Comment 에서 댓글을 조회하는 걸 만들 것이다. 운과 시간이 된다면 댓글 달기, 더 되면 댓글 삭제까지 해볼참이다.
commentSlice와 commentSaga 를 만들자.
commentSlice의 형태도 거의 똑같다.
// commentSlice.js

import { createSlice } from "@reduxjs/toolkit";

const name = "comment";

const initialState = {
    commentList: [],
    status: 0,
    statusText: "Loading",
};

const reducers = {
    getCommentList: (state, action) => {},
    getCommentListSuccess: (state, action) => {
        state.commentList = action.payload?.data ?? [];
        state.status = action.payload?.status;
        state.statusText = action.payload?.statusText ?? "Success";
    },
    getCommentListFail: (state, action) => {
        state.commentList = initialState.commentList;
        state.status = action.payload?.status ?? 500;
        state.statusText = action.payload?.statusText ?? "Network Error";
    },

    insertComment: (state, action) => {},
    insertCommentSuccess: (state, action) => {},
    insertCommentFail: (state, action) => {},

    deleteComment: (state, action) => {},
    deleteCommentSuccess: (state, action) => {},
    deleteCommentFail: (state, action) => {},
};

const commentSlice = createSlice({
    name,
    initialState,
    reducers,
});

export const commentReducer = commentSlice.reducer;
export const commentActions = commentSlice.actions;
댓글 등록과 삭제까지 액션을 만들어주었다.
commentSaga 도 유사하다.
// commentSaga.js

import { all, call, fork, put, select, take } from 'redux-saga/effects';
import { commentActions } from '../slices/commentSlice';
import axios from '../utils/axios';
import qs from "query-string";

// api 서버 연결 주소
function apiGetCommentList(requestParams) {
    return axios.get(`comments?${qs.stringify(requestParams)}`);
}

function apiInsertComment(requestBody) {
    return axios.post(`comments`, requestBody);
}

function apiDeleteComment(commentId) {
    return axios.delete(`comments/${commentId}`);
}

// api 서버 연결 후 action 호출
function* asyncGetCommentList(action) {
    try {
        const response = yield call(apiGetCommentList, { articleId: action.payload });
        if (response.status === 200) {
            yield put(commentActions.getCommentListSuccess(response));
        } else {
            yield put(commentActions.getCommentListFail(response));
        }
    } catch(e) {
        console.error(e);
        yield put(commentActions.getCommentListFail(e.response));
    }
}

function* asyncInsertComment(action) {
    try {
        const article = yield select((state) => state.articleReducer.article);
        const response = yield call(apiInsertComment, {
            id: 0,
            content: action.payload,
            boardId: article.boardId,
            articleId: article.id,
            insertDate: Date.now(),
            updateDate: Date.now()
        });
        if (response.status === 201) {
            yield put(commentActions.insertCommentSuccess());
            yield put(commentActions.getCommentList(article.id));
        } else {
            yield put(commentActions.insertCommentFail(response));
        }
    } catch(e) {
        console.error(e);
        yield put(commentActions.insertCommentFail(e.response));
        yield alert(`등록 실패 Error: ${e?.response?.status}, ${e?.response?.statusText}`);
    }
}

function* asyncDeleteComment(action) {
    try {
        const article = yield select((state) => state.articleReducer.article);
        const response = yield call(apiDeleteComment, action.payload);
        if (response.status === 200) {
            yield put(commentActions.deleteCommentSuccess());
            yield put(commentActions.getCommentList(article.id));
        }
    } catch(e) {
        console.error(e);
        yield put(commentActions.deleteCommentFail(e.response));
        yield alert(`삭제 실패 Error: ${e?.response?.status}, ${e?.response?.statusText}`);
    }
}

// action 호출을 감시하는 watch 함수
function* watchGetCommentList() {
    while(true) {
        const action = yield take(commentActions.getCommentList);
        yield call(asyncGetCommentList, action);
    }
}

function* watchInsertComment() {
    while(true) {
        const action = yield take(commentActions.insertComment);
        yield call(asyncInsertComment, action);
    }
}

function* watchDeleteComment() {
    while(true) {
        const action = yield take(commentActions.deleteComment);
        yield call(asyncDeleteComment, action);
    }
}

export default function* commentSaga()
{
    yield all([fork(watchGetCommentList), fork(watchInsertComment), fork(watchDeleteComment)]);
}
댓글 등록과 삭제부분 코드를 보면
Success 이후 모두 getCommentList() 액션을 다시 호출한다.
댓글 등록이나 삭제가 반영된 db를 재조회하는 것이다.
// 댓글 등록

function* asyncInsertComment(action) {
    try {
        const article = yield select((state) => state.articleReducer.article);
        const response = yield call(apiInsertComment, {
            id: 0,
            content: action.payload,
            boardId: article.boardId,
            articleId: article.id,
            insertDate: Date.now(),
            updateDate: Date.now()
        });
        if (response.status === 201) {
            yield put(commentActions.insertCommentSuccess());
            yield put(commentActions.getCommentList(article.id));
        } else {
            yield put(commentActions.insertCommentFail(response));
        }
    } catch(e) {
        console.error(e);
        yield put(commentActions.insertCommentFail(e.response));
        yield alert(`등록 실패 Error: ${e?.response?.status}, ${e?.response?.statusText}`);
    }
}
그리고 POST 방식의 경우 return status 가 201로 온다.
댓글의 경우 useState로 content 필드만 받아올 것이기 때문에 >>> content: action.payload,
boardId, articleId 는 state에서 가져와야 한다.
const article = yield select((state) => state.articleReducer.article);
boardId: article.boardId,
articleId: article.id,
Article.js 가 렌더링되면서 getArticle 액션이 dispatch 되는데 이때 articleReducer의 article 값이 잘 들어와야 Comment 도 같이 렌더링된다.
Saga가 제공하는 select 메서드로 article 쏙 빼온 정보만 써도 안전하다.
select를 쓴 코드의 형태를 보면 useSelector와 거의 비슷하게 생긴 것을 알 수 있다. 기능 또한 useSelector의 getState와 거의 비슷한 기능을 제공한다.
그리고 json-server 에서 primary key 시퀀스를 제공해주지만 id 컬럼을 필수값으로 넣어야 하고 -1은 그대로 서버에 반영되어 들어가기 때문에 나는 새글의 id는 0으로 넣어줬다.
// 댓글 삭제

function* asyncDeleteComment(action) {
    try {
        const article = yield select((state) => state.articleReducer.article);
        const response = yield call(apiDeleteComment, action.payload);
        if (response.status === 200) {
            yield put(commentActions.deleteCommentSuccess());
            yield put(commentActions.getCommentList(article.id));
        }
    } catch(e) {
        console.error(e);
        yield put(commentActions.deleteCommentFail(e.response));
        yield alert(`삭제 실패 Error: ${e?.response?.status}, ${e?.response?.statusText}`);
    }
}
다 만든 commentReducer 와 commentSaga를 rootReducer 와 rootSaga에 연결하자.
// rootReducer.js

import { combineReducers } from 'redux';
import { articleReducer } from './slices/articleSlice';
import { boardReducer } from './slices/boardSlice';
import { commentReducer } from './slices/commentSlice';

const rootReducer = combineReducers({ articleReducer, boardReducer, commentReducer });

export default rootReducer;
// rootSaga.js

import { map } from 'ramda';
import { all, fork  } from "redux-saga/effects"
import articleSaga from "./sagas/articleSaga";
import boardSaga from "./sagas/boardSaga";
import commentSaga from "./sagas/commentSaga";

let combineSagas = {};
combineSagas = Object.assign(combineSagas, { articleSaga, boardSaga, commentSaga });

export default function* rootSaga() {
    yield all(map(fork, combineSagas));
}
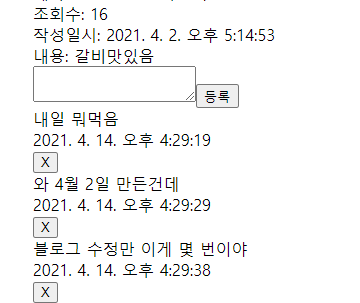
이제 Comment 에서 액션만 호출해주면 끝
// Comments.js

import React, { useEffect, useState } from 'react';
import { useDispatch, useSelector } from 'react-redux';
import { commentActions } from '../slices/commentSlice';

function Comments({ articleId }) {
    const [ newComment, setNewComment ] = useState("");
    const { commentList, status, statusText } = useSelector((state) => state.commentReducer);
    const dispatch = useDispatch();

    function onClickInsertCommentButton() {
        dispatch(commentActions.insertComment(newComment));
        setNewComment("");
    }

    function onClickDeleteCommentButton(commentId) {
        if (!window.confirm("삭제하시겠습니까?")) return false;
        dispatch(commentActions.deleteComment(commentId));
    }

    useEffect(() => {
        dispatch(commentActions.getCommentList(articleId));
    }, [dispatch, articleId]);
    return (
        <>
            <div>
                <textarea
                    value={newComment}
                    onChange={(e) => setNewComment(e.target.value)}
                />
                <button onClick={onClickInsertCommentButton}>등록</button>
            </div>
            <div>
                {
                    status === 200 ?
                    commentList.length > 0 ?
                    commentList.map((comment, index) => (
                        <>
                            <div key={comment?.id ?? index}>
                                <span>{comment?.content ?? ""}</span>
                            </div>
                            <div>
                                <span>{(comment?.insertDate) ? new Date(comment?.insertDate).toLocaleString() : ""}</span>
                            </div>
                            <div>
                                <button onClick={() => onClickDeleteCommentButton(comment?.id ?? 0)}> X </button>
                            </div>
                        </>
                    ))
                    : <div></div>
                    :
                    <div>
                        <div>
                            <span>{status}</span>
                        </div>
                        <div>
                            <span>{statusText}</span>
                        </div>
                    </div>
                }
            </div>
        </>
    );
}

export default Comments;
조회의 경우 useSelector를 이용하여 변화된 commentList, status, statusText의 state값을 가져왔다.
const { commentList, status, statusText } = useSelector((state) => state.commentReducer);

{
    status === 200 ?
    commentList.length > 0 ?
    commentList.map((comment, index) => (
        <>
            <div key={comment?.id ?? index}>
                <span>{comment?.content ?? ""}</span>
            </div>
            <div>
                <span>{(comment?.insertDate) ? new Date(comment?.insertDate).toLocaleString() : ""}</span>
            </div>
            <div>
                <button onClick={() => onClickDeleteCommentButton(comment?.id ?? 0)}> X </button>
            </div>
        </>
    ))
    : <div></div>
    :
    <div>
        <div>
            <span>{status}</span>
        </div>
        <div>
            <span>{statusText}</span>
        </div>
    </div>
}}
댓글 입력은 useState를 이용했다.
댓글은 신규생성만 할 것이기 때문에 변화값을 state 안에 보관하지 않았다.
newComment 는 ""로 초기값이 설정되어 있고 onChange 이벤트가 발생할 때마다 setNewComment를 이용하여 newComment 에 바뀐 내용을 set해준다.
const [ newComment, setNewComment ] = useState("");

<div>
    <textarea
        value={newComment}
        onChange={(e) => setNewComment(e.target.value)}
    />
    <button onClick={onClickInsertCommentButton}>등록</button>
</div>
그리고 등록한 뒤 입력칸은 다시 빈 String 으로 바꿔준다.
function onClickInsertCommentButton() {
	dispatch(commentActions.insertComment(newComment));
	setNewComment("");
}
이 부분은 다시 생각하면 saga로 넘겨서 거기서 success 할 경우 setNewComment("") 처리하는 게 더 나을 거 같다.
지금 view에서 쓴 함수는 댓글 등록이 성공하든 실패하든 무조건 초기화를 해준다.
삭제의 경우 id파라미터만 보내면 되기에 간단하다.
function onClickDeleteCommentButton(commentId) {
    if (!window.confirm("삭제하시겠습니까?")) return false;
    dispatch(commentActions.deleteComment(commentId));
}

<button onClick={() => onClickDeleteCommentButton(comment?.id ?? 0)}> X </button>
버튼 onClick 이벤트에서 ()를 빼버리면 화면 로드와 동시에 이벤트를 보낼 것이다. 그러므로 빼먹지 말아야 한다.


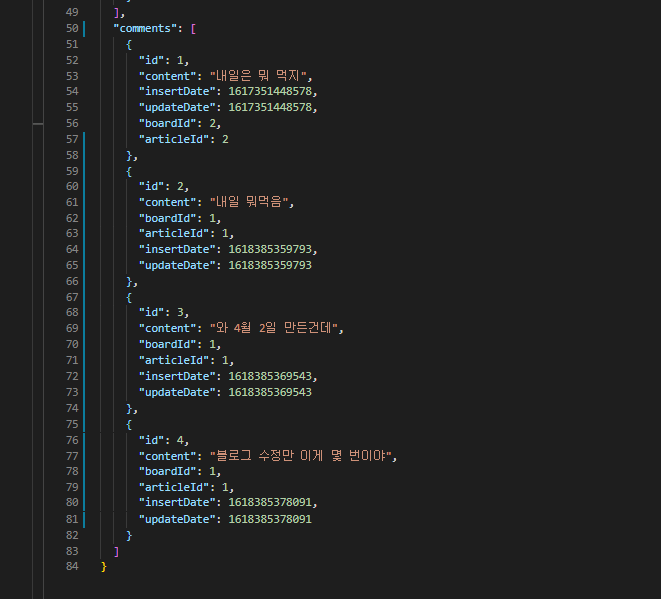
db에도 잘 들어간다.
목차돌아가기:
binaryjourney.tistory.com/pages/ReactCRUD-create-board-tutorial-v2
[React][CRUD] create-board-tutorial-v2
* 인용시 출처 부탁드립니다. 완성 소스 code: github.com/cruellaDev/react-create-board-v2 cruellaDev/react-create-board-v2 updated version of react-create-board. Contribute to cruellaDev/react-create-..
binaryjourney.tistory.com


