| 일 | 월 | 화 | 수 | 목 | 금 | 토 |
|---|---|---|---|---|---|---|
| 1 | 2 | 3 | 4 | 5 | 6 | 7 |
| 8 | 9 | 10 | 11 | 12 | 13 | 14 |
| 15 | 16 | 17 | 18 | 19 | 20 | 21 |
| 22 | 23 | 24 | 25 | 26 | 27 | 28 |
- redux
- react-router
- redux-toolkit
- sw expert academy
- 프로그래머스
- SW
- java
- JavaScript
- react
- axios
- Python
- 알고리즘
- useDispatch
- redux-saga
- Algorithm
- createSlice
- 리액트
- 매일메일
- 자바
- 이코테
- 항해플러스
- C++
- Get
- 항해99
- react-redux
- maeil-mail
- 테코테코
- 코딩테스트합격자되기
- json-server
- programmers
- Today
- Total
Binary Journey
[React][CRUD] 리액트로 간단한 게시판 페이지 만들어보기 - 7. axios 데이터 전송, 게시글 저장, useSelector 로 state 값 가져오기, redux-toolkit, axios, redux-saga 본문
[React][CRUD] 리액트로 간단한 게시판 페이지 만들어보기 - 7. axios 데이터 전송, 게시글 저장, useSelector 로 state 값 가져오기, redux-toolkit, axios, redux-saga
binaryJournalist 2020. 10. 30. 11:51
목차 돌아가기: binaryjourney.tistory.com/pages/ReactCRUD-create-board-tutorial
[React][CRUD] create-board-tutorial
code: github.com/jwlee-lnd/react-create-board jwlee-lnd/react-create-board Description(korean) : https://binaryjourney.tistory.com/pages/ReactCRUD-create-board-tutorial - jwlee-lnd/react-create-boar..
binaryjourney.tistory.com
들어가기 전에 이전까지 만든 소스에 문제가 없는지
(블로그 포스팅하면서 내가 소스 수정하고 빼먹은 부분이 있을 수도 있기에)
잠깐 확인하고 본격적으로 내용에 들어가겠다.
봐야 할 파일은 총 6개이며
해당 파일 소스 코드를 아래 코드블록에 작성해놓을테니 비교해서 빠진 부분이 있다면 수정하길 바란다.
앞서 작성한 포스팅에서 이미지와 코드 블록을 수정하긴 했지만 빠진 부분이 있다면 계속 실행이 되지 않을 것이므로 여기서 확인하고 가야 한다.
RegisterPage.js
// /src/components/views/RegisterPage.js

import React, { useState } from "react";
import { useDispatch } from "react-redux";
import RegisterOrEdit from "./Sections/RegisterOrEdit";
import { articleActions } from "../../../slice/articleSlice";

function RegisterPage() {
  const dispatch = useDispatch();

  const [TitleValue, setTitleValue] = useState("");
  const [ContentValue, setContentValue] = useState("");
  const [IsForUpdate, setIsForUpdate] = useState(false);

  const onTitleChange = (event) => {
    setTitleValue(event.currentTarget.value);
  };

  const onContentChange = (event) => {
    setContentValue(event.currentTarget.value);
  };

  const onSubmitArticle = (event) => {
    event.preventDefault();
    const article = { title: TitleValue, content: ContentValue };
    dispatch(articleActions.registerArticle(article));
  };

  return (
    <>
      <RegisterOrEdit
        titleValue={TitleValue}
        contentValue={ContentValue}
        handleTitleChange={onTitleChange}
        handleContentChange={onContentChange}
        handleSubmit={onSubmitArticle}
        updateRequest={IsForUpdate}
      />
    </>
  );
}

export default RegisterPage;
RegisterOrEdit.js
// /src/components/views/RegisterOrEdit.js

import React from "react";
import { Link } from "react-router-dom";
import { Button, Input } from "antd";

const { TextArea } = Input;

function RegisterOrEdit(props) {
  return (
    <div style={{ maxWidth: "700px", margin: "2rem auto" }}>
      <Link to="/">
        <Button>←</Button>
      </Link>
      <form onSubmit={props.handleSubmit}>
        <br />
        <div style={{ maxWidth: "700px", margin: "2rem" }}>
          <label>Title: </label>
          <Input
            onChange={props.handleTitleChange}
            value={props.titleValue}
            type="text"
            name="title"
          />
          <hr></hr>
          <TextArea
            onChange={props.handleContentChange}
            value={props.contentValue}
            name="content"
          />
        </div>
        <Button type="danger" onClick={props.handleSubmit}>
          {props.updateRequest ? "수정" : "등록"}
        </Button>
      </form>
    </div>
  );
}

export default RegisterOrEdit;
articleSlice.js
// /src/slice/articleSlice.js

import { createSlice } from "@reduxjs/toolkit";

export const articleSlice = createSlice({
  name: "article",
  initialState: { id: 0, title: "", content: "", views: 0 },
  reducers: {
    registerArticle: (state, { payload: article }) => {
      console.log(article);
    },
    registerArticleAsync: (state, { payload }) => {
      console.log(payload);
      debugger;
      return {
        ...state,
        id: payload.id,
      };
    },
  },
});

export const articleReducers = articleSlice.reducer;
export const articleActions = articleSlice.actions;
articleSaga.js
// /src/sagas/articleSaga.js

import { call, put } from "redux-saga/effects";
import Axios from "axios";
import { articleActions } from "../slice/articleSlice";

export function* registerArticleAsync(action) {
  const data = action.payload;
  debugger;
  // yield put(articleActions.registerArticleAsync(data));

}
rootSaga.js
// /src/sagas/rootSaga.js

import { takeEvery, takeLatest } from "redux-saga/effects";
import { articleActions } from "../slice/articleSlice";
import { registerArticleAsync } from "./articleSaga";

const { registerArticle } = articleActions;

export default function* rootWatcher() {
  yield takeLatest(registerArticle.type, registerArticleAsync);
}
board.json
( ./board.json )
{
  "board": [

  ]
}
확인이 끝났으면 이제 json-server를 띄우겠다.
6편에서 한 것처럼 rootfolder에서 terminal을 열어 아래를 입력한다.
npx json-server ./board.json --port 4000
json-server 가 install 된 상태라면
json-server --watch board.json --port 4000
나는 포트번호로 4000번을 사용했지만 이건 임의로 정한 거라 다른 번호로 바꿔도 된다.
다만 이따 post와 get 부분에서 포트번호를 사용할 경우가 있으니 그때도 참고해서 같이 변경해줘야 한다.
json server가 완료됐다면 http://localhost:4000/board 로 들어가보자
들어가면 json-server를 띄운 터미널에 이렇게 떠있을 것이다.

서버에 있는 정보를 GET으로 들고온다.
json-server를 이용하면서 Axios와 연동하여 데이터를 전송하고 전달받을 때 꼭 이 터미널을 같이 봐주길 바란다.
서버에 해당하는 오류들은 계속 이 터미널에서 뜰 것이다.
리액트 앱 컴파일 오류가 없는데 웹 devTool에서 원인 모를 오류가 나는 경우에도 꼭 이 서버를 띄운 터미널을 한번 체크해보길 바란다.
전송은 생각보다 매우 쉽다.
데이터 흐름을 위해 앞에서 reducer와 saga를 만들어놨으므로
기존에 만들어놓은 articleSaga의 registerArticleAsync 함수에 Axios 한 줄만 추가하면 끝이다.
// articleSaga.js

import { call, put } from "redux-saga/effects";
import Axios from "axios";
import { articleActions } from "../slice/articleSlice";

export function* registerArticleAsync(action) {
  const data = action.payload;

  const postedData = yield Axios.post(`http://localhost:4000/board/`, data);

  yield alert("저장되었습니다.");

  console.log(postedData);

}
Axios는 아마 saga 파일 처음 만들 때부터 import 되어 있을 것이다.
그러나 import가 없다면 추가하길 바란다.
yield Axios.post(`http://localhost:4000/board/`, data);
이 부분은 Axios의 post method로 data 객체를 http://localhost:4000/board/ url로 요청을 보내주는 것이다.
axios 에서는 get 으로 객체를 보낼 수는 없게 되어 있다.
github.com/axios/axios#axios-api
axios/axios
Promise based HTTP client for the browser and node.js - axios/axios
github.com
api를 보면
axios.get(url[, config])

axios.post(url[, data[, config]])
이렇게 달리 되어있다. 그래서 사용에 주의가 필요하다.
Axios 를 더 알아보고 싶다면 위의 공식문서와 다음 사이트들을 참고하면 좋다.
tuhbm.github.io/2019/03/21/axios/
Axios를 사용하여 HTTP요청하기
Axios소개Axios는 HTTP통신을 하는데 매우 인기있는 Javascript라이브러리입니다. Axios는 브라우저와 Node.js 플랫폼에서 모두 사용할 수 있습니다. 또한 IE8이상을 포함한 모든 최신 브라우저를 지원합니
tuhbm.github.io
Axios | Axios 러닝 가이드
xn--xy1bk56a.run
  yield alert("저장되었습니다.");

  console.log(postedData);
저장하는 데 영향을 아예 주지 않지만
저장이 잘 되었는지 확인차 alert를 추가했고 Axios.post() 했을 때 response 로 어떤 데이터가 오는지도 확인하기 위해 postedData로 받아 콘솔창에서 살펴보자.
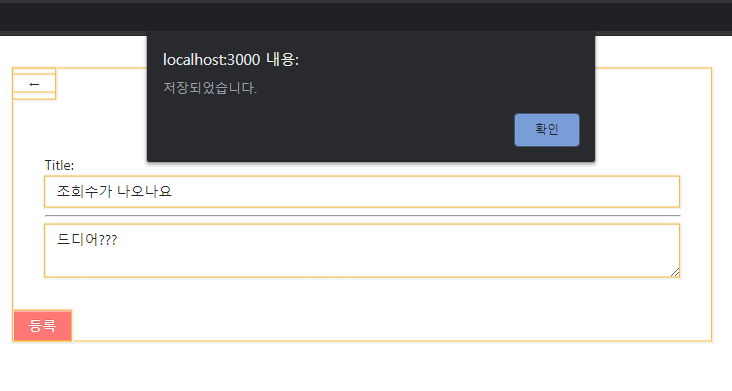
이렇게 아무말이나 쳐보고 등록을 누르면

alert 메시지가 뜨고

확인을 눌러주면 (여기까진 콘솔창에 postedData 안 뜬 상태임)
콘솔창에 이렇게 뜬다!

data 부분에 내가 적은 내용과 적지 않았는데 json-server에서 자동으로 시퀀스 준 id까지 받아온 값을 볼 수 있다.
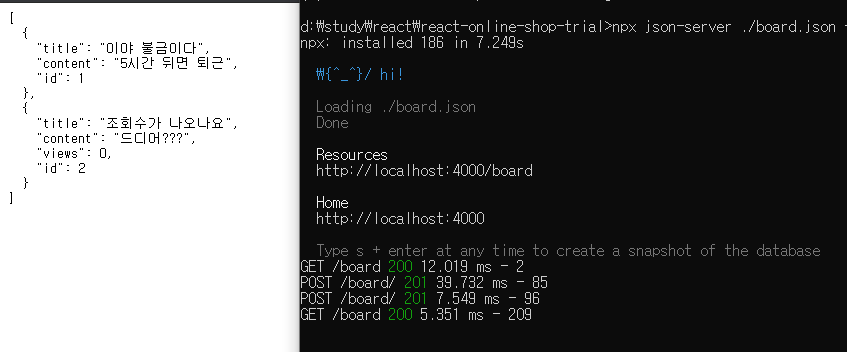
json-server 를 띄운 터미널로 가볼까

음 성공적인 POST
그렇다면 http://localhost:4000/board 에 들어가보자!
처음에 이랬던 board.json이

새창으로 들어가거나 새로고침을 하면

id 값이 다 들어가있는 것을 볼 수 있다!
근데 문제점이 생겼다.
articleSlice를 보면 initialState 로 조회수를 나타내는 views: 0 이 들어가있는데 서버에는 반영이 안 되어 있다.
아무래도 state의 views를 잡아오지 않아서 그런 것 같다.
그래서 redux의 hook인 useSelector를 사용하도록 하겠다.
RegisterPage 컴포넌트에 useSelector를 import 하고 state의 views를 가져온 뒤(articleReducers 에 있는 것을 주의) article 객체에 key:value를 추가해주자.
import { useDispatch, useSelector } from "react-redux";

  const views = useSelector((state) => state.articleReducers.views);

  const onSubmitArticle = (event) => {
    event.preventDefault();
    const article = { title: TitleValue, content: ContentValue, views: views };
    dispatch(articleActions.registerArticle(article));
  };
그리고 저장을 한 뒤 등록을 새로 해보면??

board.json에도 아주 잘 들어간 것을 알 수 있다.

나중에 조회할 때 데이터가 제자리에 잘 들어가 있어야 오류가 발생하지 않으므로 validation check를 집어넣겠다.
null 체크만 해주면 된다.
RegisterPage 컴포넌트에 onSubmitArticle 함수를
  const onSubmitArticle = (event) => {
    event.preventDefault();

    if (TitleValue === "" || TitleValue === null || TitleValue === undefined) {
      alert("제목을 작성하십시오.");
      return false;
    }

    if (
      ContentValue === "" ||
      ContentValue === null ||
      ContentValue === undefined
    ) {
      alert("내용을 작성하십시오.");
      return false;
    }

    const article = { title: TitleValue, content: ContentValue, views: views };
    dispatch(articleActions.registerArticle(article));
  };
다음과 같이 수정해준다.
그러면 빈값이 생길 때마다 다음과 같은 알림이 뜨며 글 등록을 막는다.


앞서 저장을 테스트 해본 board.json에는 id, title,content, views 의 값이 모두 잘 들어가 있어야 뒤에 구현할 게시글 조회에서 오류가 생기지 않을 것이기 때문에
board: [] 안의 내용을 직접 다 지우고 다시 저장하도록 하자 (실무에서는 이러면 큰일난다!)
(혼자 연습용으로 만드는 간단한 페이지이기 때문에 가능한 일이다.)
실행되어 있던 서버를 끄고 지운 다음에 다시 켜야 텅 빈 board.json을 볼 수 있다.

참고로 저장할 때 VSCode에 board.json을 띄워놓고 저장하면 실시간으로 값이 들어가지는 걸 볼 수 있다.

useSelector를 쓴 김에 필드를 두 개 더 추가하겠다. 서버에 timestamp 찍히는 것처럼 Slice에서 다음과 같이 추가 한다.
// articleSlice.js

import { createSlice } from "@reduxjs/toolkit";

export const articleSlice = createSlice({
  name: "article",
  initialState: {
    id: 0,
    title: "",
    content: "",
    views: 0,
    date: new Date(Date.now()), // 추가된 부분
    editDate: new Date(Date.now()), // 추가된 부분
  },
  reducers: {
    registerArticle: (state, { payload: article }) => {
      console.log(article);
    },
    registerArticleAsync: (state, { payload }) => {
      console.log(payload);
      debugger;
      return {
        ...state,
        id: payload.id,
      };
    },
  },
});

export const articleReducers = articleSlice.reducer;
export const articleActions = articleSlice.actions;
그리고 RegisterPage 컴포넌트에 useSelector 변수 date 와 editDate를 추가하는데 어차피 RegisterPage에서 view와 date, editDate가 이 화면에서 수정되거나 수정된 값이 나타날 일은 거의 없기 때문에 렌더링 될 때마다 새로 객체가 생겨나도 상관이 없다. 그래서 하나의 useSelector에서 한꺼번에 써준다
import React, { useState } from "react";
import { useDispatch, useSelector } from "react-redux";
import RegisterOrEdit from "./Sections/RegisterOrEdit";
import { articleActions } from "../../../slice/articleSlice";

function RegisterPage() {
  const dispatch = useDispatch();

 ...
  const { views, date, editDate } = useSelector((state) => ({
    views: state.articleReducers.views,
    date: state.articleReducers.date,
    editDate: "",
  }));

 ...

  const onSubmitArticle = (event) => {
  ...

    const article = {
      title: TitleValue,
      content: ContentValue,
      views: views,
      date: date,
      editDate: editDate,
    };
    dispatch(articleActions.registerArticle(article));
  };

  ...
}

export default RegisterPage;
파일을 저장한 뒤 글을 등록했을 때 json-server에 어떻게 들어가는지 확인해보자

두둥두둥
editDate는 일단 빈 string으로 들어가는 것으로 처리했다.
나중에 바꿔줄 때 어떤 일이 일어날지는 모르겠지만
그건 그때가서 생각하기로 한다 ^___________________^ (해본 적이 없어서 잘 모름)
글이 너무 길어져서 이번 편은 여기서 끝내고 다음 편은 response 로 id를 돌려받아 저장 된 게시글이 바로 화면으로 보여지는 것을 구현할 것이다.
목차 돌아가기: binaryjourney.tistory.com/pages/ReactCRUD-create-board-tutorial
[React][CRUD] create-board-tutorial
code: github.com/jwlee-lnd/react-create-board jwlee-lnd/react-create-board Description(korean) : https://binaryjourney.tistory.com/pages/ReactCRUD-create-board-tutorial - jwlee-lnd/react-create-boar..
binaryjourney.tistory.com


